.jpg)
Photography
Workshops:
additional theory Q&A
Did you attend one of my classes but still have a few questions? No worries! Take a look at the Q&A below. You might find the answers you’re looking for!
Some questions still unanswered?
You've come to the right place!
Hello! You’ve most likely attended one of my photography classes: welcome to my FAQ page! Here, you’ll find additional information to help answer any questions you might still have. In this Q&A, I cover the theory and camera settings across several key topics:
A. Exposure Triangle: Aperture, Shutter Speed and ISO
B. Lenses and Optics
C. Camera sensors & bodies
D. Analog Photography (Film)
E. Shooting modes and camera functions
F. Best practices for beginners street photographers
If your question isn’t listed here, feel free to email me at biancadegrootphotography(at)gmail.com. I’ll do my best to help! Hope to see you in a future class!
Frequently Asked
Questions
A. Exposure Triangle: Aperture, Shutter Speed and ISO
(1/3) APERTURE
1. What is the diaphragm in a lens?
The diaphragm is the adjustable opening inside a camera lens that controls how much light passes through to the sensor. This opening is known as the aperture.
2. Why are apertures written as f/1.4, f/2, f/2.8, etc.?
These values are called f-numbers or f-stops. They are part of a standardized scale used to describe the size of the aperture. A smaller f-number, like f/1.4, indicates a larger aperture that lets in more light. A larger f-number, like f/16, represents a smaller aperture that lets in less light. Each step on this scale either halves or doubles the amount of light entering the camera.
3. What is a 'stop' of light?
In photography, a stop refers to doubling or halving the amount of light in an exposure. This unit of measurement applies to aperture, shutter speed, and ISO. For example, changing the aperture from f/2 to f/2.8 reduces the light by one stop (half as much light). Changing from f/4 to f/2.8 increases the light by one stop (twice as much light). Even though the numbers look irregular, the pattern is based on a consistent mathematical system.
4. Why do aperture numbers follow this unusual sequence?
The f-stop scale is based on the square root of 2, approximately 1.414. Each f-number is about 1.414 times the previous one. This mathematical relationship ensures that each step up or down the scale changes the amount of light by a factor of two. That’s why the scale progresses like this: f/1, f/1.4, f/2, f/2.8, f/4, f/5.6, f/8, and so on. Each step either doubles or halves the light that reaches the sensor.
5. Why is the square root of 2 used to calculate f-stops?
The amount of light that reaches the sensor depends on the area of the aperture, not just its diameter. The area of a circular aperture is proportional to the square of its diameter. To double or halve the area, you must multiply or divide the diameter by the square root of 2. So, when you multiply an f-number by approximately 1.414, you're changing the aperture size just enough to double or halve the light. This keeps exposure changes predictable and consistent.
6. Where do f-numbers come from?
F-numbers are calculated by dividing the focal length of the lens by the diameter of the aperture opening. For example, if you have a 50mm lens and the aperture is 25mm wide, the resulting f-number is 50 divided by 25, which equals f/2.
7. What does the “f” stand for in f-stop or f-number?
The “f” stands for focal length. An f-number expresses the size of the aperture in relation to the lens’s focal length. That’s why it’s written as f divided by a number, such as f/2 or f/8.
8. What is an f-stop or f-number?
An f-stop (or f-number) describes the size of the lens’s aperture and controls how much light enters the camera. A smaller f-number like f/1.8 means a wider aperture, which allows more light to hit the sensor and results in a shallow depth of field. A larger f-number like f/16 means a smaller aperture, less light, and a deeper depth of field.
9. What is the smallest and largest f-stop?
The minimum and maximum f-stops depend on the lens. Some lenses can open as wide as f/1.2 or even wider, while many standard lenses stop down to f/22 or smaller for maximum depth of field.
10. How does aperture affect depth of field?
Wider apertures, represented by smaller f-numbers like f/1.8 or f/2.8, produce a shallower depth of field. This means only a small part of the image is in focus while the rest is blurred. Narrower apertures, such as f/11 or f/16, produce a greater depth of field, keeping more of the image in focus from foreground to background.
11. What is 'bokeh'?
Bokeh refers to the visual quality of the out-of-focus areas in a photograph, typically the background. It's most noticeable when shooting with a wide aperture. The subject appears sharp while the background becomes soft and blurry. The look of the bokeh depends on the aperture size, lens design, the number and shape of aperture blades, the focal length of the lens, and the distance between the subject and background. Lenses with smooth, rounded aperture blades tend to produce more pleasing bokeh.
12. What’s the difference between f/1.8 and f/2.8?
The difference lies in the amount of light that each aperture allows through the lens. An f/1.8 aperture is wider than f/2.8 and lets in more light, which is useful in low-light situations and for achieving a very shallow depth of field. An f/2.8 aperture lets in less light but can still produce background blur and is often used when slightly more depth of field is needed.
13. How do I adjust the aperture on a camera?
On most digital cameras, you adjust the aperture using a dial or wheel, often marked with the f-number on your screen or viewfinder. On analog film cameras, especially older manual models, you adjust the aperture using the diaphragm ring on the lens itself: this ring is usually marked with f-stop numbers like f/2.8, f/4, f/5.6, etc. Simply turn the ring to set the aperture you want.
14. Does every lens let me choose the same aperture range?
No. Each lens has its own aperture range based on its design. A fast prime lens might offer f/1.4, while a standard kit zoom might only go as wide as f/3.5. Some zoom lenses have variable apertures (e.g., f/3.5–5.6), meaning the maximum aperture changes as you zoom in or out.
15. What’s the difference between a lens with f/1.4 and one with f/4?
A lens with f/1.4 is “faster”: it allows more light in, which is better for low light and gives a much shallower depth of field, resulting in stronger background blur. An f/4 lens doesn’t let in as much light, so it may need higher ISO or slower shutter speeds in dim conditions.
16. Why does my aperture change when I zoom in?
This happens with variable aperture zoom lenses. As you zoom in, the physical construction of the lens limits how wide the aperture can stay, so the maximum aperture gets smaller (e.g., from f/3.5 at wide angle to f/5.6 at telephoto). This affects your exposure and depth of field.
17. What happens inside the lens when I change the aperture?
When you change the aperture, you’re adjusting the size of the diaphragm inside the lens: a set of overlapping blades that form a circular opening. A wide aperture (low f-number) opens the blades wider, letting in more light. A narrow aperture (high f-number) closes them down, reducing light entry.
18. How does aperture affect lens sharpness?
Most lenses are sharpest between f/5.6 and f/8, known as the "sweet spot." Shooting wide open (e.g., f/1.8) can introduce softness or slight vignetting, while very narrow apertures (like f/22) can cause diffraction, which reduces sharpness.
(2/3) SHUTTER SPEED
1. What is shutter speed?
Shutter speed is the length of time your camera's sensor (or film) is exposed to light. It's measured in seconds or fractions of a second, such as 1/1000s, 1/125s, or even several seconds. The faster the shutter opens and closes, the less light hits the sensor, and the more motion is frozen in the image.
2. What is considered a fast shutter speed?
A fast shutter speed is typically 1/500s or faster. These speeds are used to freeze motion, making them ideal for capturing fast-moving subjects like sports, wildlife, or anything where you want sharp detail without blur. At these speeds, even small movements are frozen in time.
3. What is a slow shutter speed?
A slow shutter speed is generally 1/60s or slower. At these settings, the shutter stays open longer, which can introduce motion blur if either the subject or the camera moves. Slow shutter speeds are often used intentionally for creative effects, such as light trails, smooth water, or to convey a sense of motion. They are also useful in low-light settings, though a tripod is often recommended to avoid unwanted camera shake.
4. How do I choose the right shutter speed?
The right shutter speed depends on how much motion you want to capture or freeze. For general handheld photography, a minimum of 1/100s is a safe starting point to avoid blur from small movements. If you're photographing people walking or gesturing, 1/100s to 1/250s usually works well. For fast-moving subjects like sports, wildlife, or vehicles, you may need 1/1000s or faster. On the other hand, if you want to create motion blur or capture light trails at night, slower shutter speeds such as 1/30s, 1 second, or even longer may be the right choice.
5. What happens if my shutter speed is too slow?
If your shutter speed is too slow and you're shooting handheld, even small movements -like the natural shake of your hands- can cause blur in your image. This is called camera shake. It can also blur any moving subjects in your scene, whether that's people walking or cars passing by.
6. Can I shoot handheld at slow shutter speeds?
You can, but there's a general rule of thumb: use a shutter speed that’s at least the reciprocal of your focal length. For example, if you're shooting at 50mm, aim for a shutter speed of at least 1/50s to minimize blur. That said, image stabilization (IBIS or lens-based) can help you shoot slower than this without introducing camera shake.
7. When should I use a tripod?
A tripod is essential for shutter speeds slower than about 1/60s, especially in low light, night scenes, or long exposures (like 1 second or more). It keeps the camera steady, so you can use creative slow-shutter effects without blurring the entire image.
8. Can shutter speed affect exposure?
Yes, absolutely. A slower shutter speed lets in more light, making your image brighter. A faster shutter speed reduces the amount of light, which darkens the image. Shutter speed is one of the three key parts of the exposure triangle, along with aperture and ISO.
9. How do I create motion blur on purpose?
To intentionally blur motion (like flowing water, moving cars, or people walking), use a slower shutter speed like 1/30s, 1/10s, or even several seconds. You’ll usually need a tripod to keep the rest of the image sharp while the movement blurs beautifully.
10. What’s a good shutter speed for panning shots?
Panning is when you move the camera along with a moving subject (like a bike or car) to keep them sharp while blurring the background. For this technique, try a shutter speed between 1/30s and 1/125s. It may take a few tries, but the results can be very dynamic.
(3/3) ISO
1. What is ISO?
ISO is a setting that controls your camera sensor's sensitivity to light. A low ISO value (like ISO 100) means low sensitivity, which is ideal in bright conditions. A high ISO value (like ISO 3200 or more) increases sensitivity, which helps in low-light situations but can also introduce more digital noise into the image.
2. What does ISO do in low light?
In low-light situations, increasing the ISO makes the image brighter by making the sensor more sensitive to the available light. While this allows you to shoot in darker environments without needing a tripod or slower shutter speed, it comes with a trade-off: the higher the ISO, the more noise or grain you'll see in your photo, especially in the shadow areas.
3. Why should I use low ISO in good light?
Using a low ISO in good lighting helps you maintain the highest image quality possible. Lower ISO settings produce cleaner images with finer detail and less digital noise. This is especially important for prints, professional work, or when editing heavily in post-production.
4. What is digital noise, and why does it happen?
Digital noise looks like random specks or grain in your image, especially in darker areas. It happens when the sensor boosts the signal too much (at high ISO settings), and some unwanted interference gets recorded along with the light. The higher the ISO, the more this visual “static” tends to appear.
5. Is noise the same as film grain?
Not exactly. Film grain is a natural result of the chemical particles in film and is often seen as pleasing or nostalgic. Digital noise, on the other hand, is electronic and can be distracting or harsh. Some modern cameras do a good job at mimicking film grain or reducing digital noise, but they’re still technically different.
6. What does ‘increasing sensitivity’ actually mean? What happens inside my camera?
Increasing ISO doesn’t make your sensor literally more sensitive to light: it boosts the signal that the sensor receives. Think of it like turning up the volume on a quiet recording: you hear more, but you also hear more static. So ISO amplifies the light data your sensor collects, but it also amplifies noise.
7. Can I fix noise in editing?
Yes, to some extent. Most editing software has noise reduction tools that smooth out grain or color noise. However, this can sometimes reduce sharpness or detail, so it's better to keep ISO as low as possible in-camera for best results.
8. Should I always use Auto ISO?
Auto ISO is helpful when you’re shooting in changing light, like on the street or during events. Most cameras let you set a maximum ISO limit, which helps avoid extreme noise. However, in very controlled lighting or when shooting on a tripod, setting ISO manually gives you more control over image quality.
9. What’s the ideal ISO for night photography?
It depends. For night city scenes with a tripod, you can use ISO 100 or 200 and a longer shutter speed. For handheld shots or moving subjects, ISO 1600–6400 may be necessary. Try to find a balance between brightness and acceptable noise.
10. Do newer cameras handle high ISO better?
Yes. Modern sensors -especially full-frame ones- tend to perform much better at high ISO settings, producing cleaner images with less visible noise than older or smaller-sensor cameras.
B. Lenses & Optics
1. What is Focal Length?
Focal length is the distance, measured in millimeters, between the optical center of a lens and the camera sensor (or film) when the lens is focused at infinity—that is, when you’re focusing on very distant subjects like mountains or stars. This number is usually marked on the lens itself, such as 50mm, 24mm, or 200mm. The optical center is a point inside the lens where light rays converge before reaching the sensor or film, which is where the image is captured.
2. What Does Focal Length Affect?
Focal length influences several important aspects of your photos:
-
Field of View: Short focal lengths (like 24mm) give you a wide-angle view, which is great for landscapes or architecture because you capture more of the scene. Longer focal lengths (like 200mm) provide a narrow view but make distant subjects appear closer, perfect for wildlife or sports photography.
-
Magnification/Zoom: The longer the focal length, the larger subjects appear in your frame. Conversely, shorter focal lengths make subjects look farther away.
-
Depth of Field: Longer focal lengths tend to create a shallower depth of field, which means more background blur and stronger subject separation.
3. Types of Lenses
There are several common lens types you’ll encounter:
-
Prime lenses: These have a fixed focal length (for example, 35mm, 50mm, or 85mm).
-
Zoom lenses: These cover a range of focal lengths in one lens, allowing you to zoom in or out without changing lenses. Common zoom ranges include 18-55mm, 24-70mm, and 70-200m.
-
Telephoto lenses: Designed for long distances, telephoto lenses typically have focal lengths starting at 70mm and going up to 300mm, 400mm, or even longer.
-
Wide-angle lenses: Have short focal lengths, usually between 14mm and 35mm, and are great for capturing broad scenes like landscapes and architecture.
-
Macro lenses: Designed for close-up photography with high detail, macro lenses generally range from 50mm to 105mm in focal length.
-
Kit lenses: Entry-level zoom lenses that often come bundled with cameras, such as the popular 18-55mm zoom. They are good for beginners but usually limited in low-light performance.
4. Prime Lens vs. Zoom Lens
-
Prime lenses: Prime lenses are generally sharper, offer wider apertures for shooting in low light or creating background blur, and are usually lighter. Their fixed focal length encourages careful composition and can deliver excellent image quality.
-
Zoom lenses: Zoom lenses are more flexible, covering multiple focal lengths in one lens, which is convenient for travel or events where you need to quickly adjust your framing without moving around. Each has its strengths depending on your shooting style.
5. How Does Aperture Affect Sharpness?
Most lenses perform best and produce the sharpest images around f/5.6 to f/8. This range is often called the lens’s “sweet spot,” where sharpness is maximized and optical imperfections are minimized.
C. Camera sensors & bodies
1. How are full-frame, crop sensor, DSLR, and mirrorless cameras related? What other types are there?
Full-frame vs crop sensor cameras refer to the size of the image sensor inside the camera, while DSLR vs mirrorless describe the camera body type and how you view your subject:
1.1. Sensor Size: Full-frame sensor vs crop sensor
-
Full-frame sensor: A full-frame sensor is the same size as traditional 35mm film, measuring about 36 x 24 millimeters. Because of their larger size, full-frame sensors capture a wider field of view compared to smaller sensors. This means your photos include more of the scene, which is especially helpful in landscape, architecture, and low-light photography. Full-frame cameras also tend to perform better in dim lighting and allow for a shallower depth of field, helping you create images with beautiful background blur and subject separation. These sensors are commonly found in professional and enthusiast-level cameras.
-
Crop sensor (also called APS-C): Crop sensors, also known as APS-C sensors, are smaller than full-frame sensors. Their reduced size “crops” the image compared to full-frame, effectively narrowing the field of view. This cropping is measured by a crop factor, usually around 1.5× or 1.6×, which means a lens will appear to zoom in more on the subject. For example, a 50mm lens on a crop sensor camera acts more like a 75–80mm lens on a full-frame camera. Crop sensor cameras are generally more compact, lighter, and more affordable, making them a popular choice for beginners and hobbyists. While they may not perform as well as full-frame sensors in low light, they still produce excellent image quality for most photography needs.
1.2. Camera design: DSLR vs mirrorless
DSLR and mirrorless describe the camera's design and how you see your subject:
-
DSLR camera's: DSLRs use a mirror and optical viewfinder system to show you through the lens,
-
Mirrorless camera's: mirrorless cameras don’t have a mirror and rely on electronic viewfinders or the LCD screen. Both DSLR and mirrorless cameras can have either full-frame or crop sensors.
-
Other camera types include medium format cameras, which have even larger sensors than full-frame and offer extremely high resolution (like the Fujifilm GFX series), and compact point-and-shoot cameras, which are small, fixed-lens cameras with smaller sensors, perfect for casual use.
2. What does crop factor mean again?
Crop factor is a multiplier that describes how much smaller the crop sensor is compared to full-frame. It affects your lens’s effective focal length. So, a 50mm lens on an APS-C crop sensor camera behaves like a 75mm lens on a full-frame camera because of the 1.5× crop factor.
3. What are some examples of full-frame and crop sensor cameras?
Full-frame cameras include models like Sony’s A7 IV, Nikon’s Z6 II, and Canon’s R5. Crop sensor cameras include Sony’s A6000 series, Nikon’s Z50 and Zfc, Canon’s R50 and R7, and most of Fujifilm’s X-series like the X-T5. Fujifilm doesn’t make full-frame cameras but offers high-end medium format models.
4. What does DSLR mean?
DSLR stands for Digital Single-Lens Reflex. These cameras use a mirror and prism system so you can look directly through the lens with an optical viewfinder. When you take a photo, the mirror flips up, the shutter opens, and light hits the sensor. DSLRs have become less dominant as mirrorless cameras grow in popularity. Mirrorless models tend to be smaller, lighter, and offer faster autofocus and higher frame rates.
5. What is the difference in depth of field between crop and full-frame sensors?
At the same aperture, crop sensor cameras tend to have a greater depth of field than full-frame cameras. This means more of your scene will be in focus on a crop sensor, while full-frame allows for a shallower depth of field and more background blur.
6. What is dynamic range?
Dynamic range is the sensor’s ability to capture detail in both the darkest shadows and the brightest highlights of a scene. A higher dynamic range means your camera can handle more contrast without losing detail.
7. What’s the difference between a mechanical and electronic shutter?
A mechanical shutter uses physical moving parts to open and close, letting light reach the sensor. An electronic shutter exposes the sensor digitally without moving parts, which means it’s silent and can be faster, but sometimes prone to certain distortions with fast motion.
8. How does a camera sensor work?
The sensor converts incoming light into digital data using millions of tiny light-sensitive elements called photosites or pixels. Each pixel records how much light it receives, which the camera processes into an image.
9. What does APS-C stand for?
APS-C stands for Advanced Photo System type-C. It originated from the Advanced Photo System film format used in the 1990s. The “C” refers to “Classic,” a film size roughly the same as today’s APS-C sensors, which are smaller than full-frame but larger than most compact camera sensors.
D. Analog Photography (Film)
1. How do I load a new roll of film in an analog camera?
First, open the back of the camera by lifting the rewind lever and pressing the release button. This will open the back panel. Next, insert the film canister with the label facing you and the bump on the bottom, placing it into the film chamber, usually located on the left side. Push down the rewind knob or lever to secure the 35mm film canister in place. Then, gently pull the film leader (the tapered end of the film) across to the right side. Insert the leader into the take-up spool slot or feed it into the spool gears, depending on your camera model. Advance the film by winding the film advance lever and pressing the shutter once or twice to ensure the film is properly engaged on the take-up spool. You should see the sprocket teeth catch the holes along the film’s edge. Finally, close the back securely and continue advancing and shooting until the frame counter reads “1,” indicating your first usable frame. As you do this, watch the rewind knob on the left move—this confirms the film is advancing correctly inside the camera.
2. How do I rewind and unload film from a 35mm camera?
Locate the film release button on the bottom of your camera and press it. Open the rewind crank on the left side: just lift the small lever but don’t pull it up yet. Turn the rewind crank clockwise until you hear a popping sound, which means the film has fully disengaged inside the camera. Then, pull up the rewind crank lever, open the camera back, and carefully remove your film roll.
3. What types of film are available?
Popular films include Kodak Portra, known for its warm, natural colors; Ilford HP5, a classic black-and-white film with noticeable grain; Fujifilm’s various color and black-and-white options; and Cinestill, which offers cinematic tones and unique color profiles. Each film has its own character in terms of color rendition, grain, and contrast.
4. How many photos can I get per roll?
Standard 35mm film rolls usually offer either 24 or 36 exposures.
5. What ISO film should I use?
For bright daylight, ISO 100 or 200 is ideal. ISO 400 works well for cloudy days or indoor lighting, while ISO 800 and above is better suited for low-light or night photography.
6. Can I shoot one roll in different lighting conditions?
Yes, you can, but it’s best to use flexible films like Kodak Portra 400, which handle a range of lighting conditions more gracefully without losing much quality.
7.What is the Sunny 16 rule?
The Sunny 16 rule is a guideline to estimate proper exposure without a light meter. It suggests setting your aperture to f/16 on a sunny day and matching your shutter speed to the ISO of your film (for example, 1/100s for ISO 100 film) to get a correctly exposed photo.
8. What does it mean to ‘push film,’ and can I do that?
Pushing film means shooting at a higher ISO than the film’s rating and then adjusting the development process to compensate. This technique increases the film’s effective sensitivity, allowing you to shoot in lower light but can increase contrast and grain. Yes, you can push film, but it’s best done with some experience or by a professional lab to get good results.
9. How do I know if the film is loaded correctly?
After closing the camera back, advance the film using the lever and watch the rewind knob. If it rotates as you wind and shoot, the film is advancing properly. If the knob doesn’t move, the film might not be loaded correctly.
10. What is the difference between color and black-and-white film?
Color film captures a full spectrum of colors and is ideal for vibrant, lifelike images. Black-and-white film captures tones of gray and is often used for a more classic, moody, or timeless look. Each has its own aesthetic and processing requirements.
11. What is film grain?
Grain refers to the visible texture or pattern in film images caused by the light-sensitive particles in the emulsion. Higher ISO films tend to show more grain. Some photographers love grain for its nostalgic, analog character.
12. What’s the difference between 35mm and 120 (medium format) film?
35mm film is smaller and more common, offering 24 or 36 exposures. Medium format (120) film is larger, producing higher-resolution images but fewer shots per roll, typically 10 to 16, depending on your camera’s frame size.
13. How should I store unused film?
Keep film in a cool, dry place. For best longevity, store it in the fridge (but let it return to room temperature before shooting). Avoid hot or humid environments, which can degrade film quality over time.
14. Can expired film still be used?
Yes, but with unpredictable results. Colors may shift, grain may increase, and contrast can drop. Some photographers use expired film intentionally for its unique, vintage look. If trying it, start with black-and-white film, which tends to age more gracefully.
15. How do I get my film developed?
You can drop it off at a local lab, mail it to an online lab, or learn to develop it yourself (especially B&W film, which is more beginner-friendly to process at home). Labs typically offer options for prints, digital scans, or both.
16. Can I scan film negatives myself?
Yes! With a flatbed scanner or a dedicated film scanner, you can digitize your negatives at home. There are also DIY setups using a digital camera, lightbox, and film holders for higher-resolution results.
17. What are contact sheets?
A contact sheet is a printed or digital page showing all the images from a roll of film, usually as small thumbnails. It’s useful for reviewing your shots before deciding which to enlarge or edit.
18. What is DX coding on film canisters?
DX coding is a set of silver-and-black blocks on 35mm film canisters. Automatic film cameras read this to detect the film's ISO, number of exposures, and more. If your camera is fully manual, you’ll need to set ISO manually instead.
E. Shooting modes & camera functions
1. What are the main camera modes?
Most cameras offer four main shooting modes:
- Manual (M) gives you full control over aperture, shutter speed, and ISO.
- Aperture Priority (A or Av) lets you choose the aperture while the camera selects the shutter speed.
- Shutter Priority (S or Tv) allows you to set the shutter speed while the camera picks the matching aperture.
- Program Mode (P) is semi-automatic: the camera chooses both aperture and shutter speed, but you can still adjust things like ISO and exposure compensation.
2. Can you explain those modes briefly?
Yes! In Manual mode, you set everything yourself: ideal when you want total creative control. Aperture Priority is great when you want to control depth of field but let the camera handle timing. Shutter Priority is useful when freezing or blurring motion is your main focus. Program mode is a flexible auto mode with some manual override, good for quick snapshots when you don’t want to think too much.
3. What’s the best mode for beginners?
Aperture Priority is a great place to start. It gives you creative control over how much of your scene is in focus, while the camera takes care of the right shutter speed (and ISO). It’s fast, easy to use, and helps you focus on composition and timing.
4. When should I shoot in Manual mode?
Manual mode works best when the lighting is consistent and you want full control, for example, during street photography, in the studio, or at night. It’s also helpful when you’re using artificial lighting or want to keep your settings locked in for a specific creative look.
5. What is exposure compensation?
Exposure compensation lets you quickly make an image lighter or darker when shooting in Aperture Priority, Shutter Priority, or Program mode. If your photo looks too dark, you can dial in +1 or +2 to brighten it. If it’s too bright, you can reduce exposure with -1 or -2. It’s a simple tool to fine-tune your exposure without switching to Manual.
6. What is metering?
Metering is how your camera measures the light in a scene to decide what the correct exposure should be. Based on this reading, it sets the exposure automatically (or gives you a guide when shooting manually).
7. What are the different metering modes?
Most cameras offer a few metering options.
-
Spot metering measures light from a very small area (usually the center or focus point), ideal when your subject is backlit.
-
Center-weighted metering looks mostly at the middle of the frame but includes some of the surroundings.
-
Evaluative (or Matrix) metering considers the entire scene and is great for most situations.
8. What’s the difference between RAW and JPEG?
RAW files contain all the image data your sensor captures: this gives you much more flexibility when editing exposure, white balance, and color in post-processing. JPEG files are processed in-camera and compressed, meaning they take up less space and are ready to use straight away, but with less room for editing.
9. How does white balance affect my photos?
White balance adjusts the color temperature of your image to match the lighting conditions. For example, under warm indoor light, your image might look too yellow unless corrected. In daylight, it might look too blue in the shade. You can set white balance manually or leave it on auto, though adjusting it in post is easier if you shoot in RAW.
10. What are all the other buttons and labels like M-Fn, Q, or Fn on my camera?
These vary by brand and model, but many are shortcuts to helpful settings. For example, M-Fn (Multi-function) and Fn (Function) buttons can often be customized. Q on Canon or i on Nikon opens a quick settings menu. It’s worth checking your camera manual -or just exploring- to learn what each one does. Once you’re familiar with them, they’ll speed up your shooting significantly.
11. What’s the difference between AF (Autofocus) and M (Manual focus)?
AF lets the camera automatically focus on your subject, which is great for quick shots or moving subjects. Manual focus means you adjust the focus ring yourself, which is useful for precise control or tricky lighting/situations where autofocus might struggle.
12. What autofocus (AF) modes should I use?
Common modes include
-
Single AF (focus locks when you half-press the shutter),
-
Continuous AF (keeps focusing on moving subjects), and
-
Automatic AF (the camera switches based on whether your subject moves).
13. What is focus peaking?
Focus peaking highlights the sharp areas in your frame when using manual focus, helping you see exactly what’s in focus.
14. What does image stabilization (IS or VR) do?
It reduces blur caused by camera shake, especially useful at slower shutter speeds or with long lenses.
15. What is burst mode or continuous shooting?
It lets you take several photos in quick succession, perfect for action or sports photography.
15. What does ISO Auto do?
In modes like Aperture or Shutter Priority, Auto ISO lets the camera adjust ISO to maintain a good exposure, helping you shoot faster without under- or overexposed images.
16. What’s the difference between single-shot and continuous shooting modes?
-
Single-shot mode takes one photo each time you press the shutter button.
-
Continuous shooting mode (sometimes called burst mode) lets you take multiple photos in rapid succession as long as you hold the shutter button down.
You can usually switch between these modes using a button or dial labeled with an icon showing one rectangle (single shot) or multiple stacked rectangles (continuous). On some cameras, this setting is found in the shooting menu or on a dedicated drive mode button. Check your camera’s manual if you’re unsure!
17. What does the histogram tell me?
A histogram shows the tonal range of your photo from shadows (left) to highlights (right), helping you check exposure and avoid clipping.
18. What is bracketing?
Bracketing takes several photos at different exposures so you can choose the best one or combine them later for HDR.
19. What’s the use of custom white balance?
It lets you manually set the white balance by using a neutral reference (like a gray card) for accurate colors in tricky lighting.
F. Best practices for beginners street photographers
1. What are the best settings for street photography?
A great starting point is to shoot in Aperture Priority mode. Set your aperture between f/5.6 and f/8 to ensure a decent depth of field, so more of your scene stays in focus. Use Auto ISO to help your camera adapt to changing light conditions. Keep your shutter speed at 1/250s or faster to freeze everyday motion like walking, especially if you're shooting handheld.
2. How do I freeze action in the street?
To freeze movement clearly, you need a fast shutter speed. For walking subjects, 1/250s is usually enough. If you’re capturing cyclists, cars, or faster motion, aim for 1/1000s or higher to avoid motion blur.
3. How can I handle harsh contrast in bright sunlight?
In situations with strong light and shadow, try using exposure compensation to slightly underexpose the scene and retain highlights. Alternatively, switch to spot metering to expose for your subject, especially if they’re backlit or in partial shade.
4. How do I capture candid moments?
Candid moments often come when people are unaware they’re being photographed. Keep your camera ready, move casually, and don’t draw too much attention. Some photographers shoot from the hip for a more discreet approach, while others find a good spot and wait patiently for the right moment to unfold.
5. What makes a good street photo?
A strong street photo usually comes down to a combination of light, timing, emotion, and clean composition. Capturing a moment that feels real and spontaneous, while keeping your frame visually organized, helps tell a compelling story.
P.S. I’ve created a class all about Composition in Photography, feel free to check it out if you’d like to go deeper!
6. Where should I stand when shooting in the street?
Position yourself in places where you can make use of symmetry, leading lines, or clean backgrounds. Corners, crosswalks, and interesting architectural elements often provide good backdrops and natural framing for your subjects.
P.S. I’ve created a class all about Composition in Photography, feel free to check it out if you’d like to go deeper!
7. Is it okay to cut people off in the frame?
Yes, cropping people is often unavoidable in busy street scenes, but do it with intention. Try to avoid cutting through joints like elbows, knees, or necks, as it can look awkward or accidental. Instead, frame your shots in a way that feels deliberate and visually balanced.
8. What lenses are best for street photography?
Many street photographers prefer prime lenses between 28mm and 50mm for their natural perspective and compact size. A wide-angle lens can capture more of the environment, while a longer lens (like 85mm) lets you shoot from a distance discreetly.
9. How do I stay respectful while photographing strangers?
Always be aware of your surroundings and respect people’s privacy. If someone looks uncomfortable, consider asking permission or moving on. Being polite and approachable helps build trust and can even lead to great interactions.
10. Should I use autofocus or manual focus on the street?
Autofocus is usually faster and more practical for street shooting, especially with moving subjects. Some photographers prefer back-button autofocus to separate focusing from the shutter button for more control. Manual focus can work if you pre-focus at a certain distance and wait for subjects to enter that zone.
11. How do I deal with low light or nighttime street photography?
Use a wider aperture (like f/1.8 or f/2.8) and higher ISO settings to capture enough light. A fast lens and a steady hand or tripod help avoid blurry shots. Experiment with longer shutter speeds for creative effects, but be mindful of motion blur.
12. What’s a good mindset for street photography?
Be patient, curious, and open to unexpected moments. Stay relaxed, keep your camera ready, and don’t be afraid to make mistakes — they’re part of learning and discovering your style.
13. How important is post-processing for street photos?
Editing can enhance your photos by adjusting exposure, contrast, and colors, or by cropping to improve composition. Try to keep edits natural to preserve the authentic feel of the moment.
14. How do I approach strangers for portraits on the street?
A friendly smile and a brief introduction usually help. Explain why you want to take their photo, and be ready to show them your work if they ask. Respect their decision if they say no.
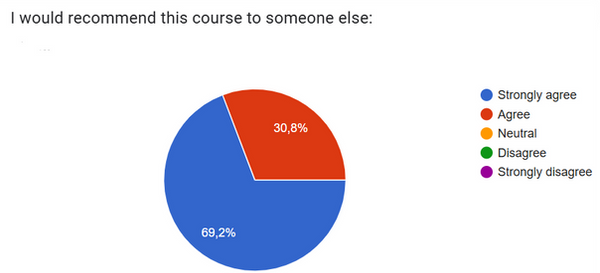
Testimonials
70% of my students have given this lecture a 10/10!

This is what they have appreciated about my classes: